
You know what's amazing? You can now add double sided adhesive for handmade paper envelopes. And no, you don't need to be purchasing wedding stationery to include it. Since handmade paper envelopes do not come gummed, this is a hassle free solution if you don't plan on gluing the envelopes one by one.
Now that you read the previous blog about the difference between sealing envelopes with gummed flaps or adding a double sided adhesive. This blog is more about why you may want to consider sealing handmade paper envelopes with double sided adhesives. If you are a Wedding Stationer, the best and efficient way is to use double sided adhesive tape, especially a tape gun.
Disclaimer: Like all my blog posts, it is only for guidance or reference. The tips we share are personal experiences which will of course differ from everyone else.
What is a double sided adhesive?
As I explained in the previous blog, double sided adhesives or double sided tapes are sticky on both sides. It's the perfect solution for sealing envelopes efficiently and beautifully! The double sided adhesive (add on) I offer in my store has the perfect bond for paper textures. You want one that isn't so strong it tears the entire envelope apart and can achieve a great "tearing experience" every single time.
The perfect "tearing experience"
The "tearing experience" is a term I came up with in the previous blog. As a stationer, I love client feedbacks and the one thing I found was how difficult it can be to seal envelopes properly. And the one that really stuck with me is the being able to re-seal an envelope so the client or their guest(s) can hold onto it as a keepsake. Also to keep it looking almost pristine and not torn to bits. A good envelope will seal, re-seal and tear open well. Honestly, the perfect "tearing experience" is when it's both a very sophisticated and satisfying experience.
Let's put it to the test!
The following is an example using the double sided adhesive to seal, tear and re-seal the handmade paper envelope.


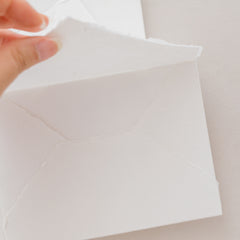


Easy peasy! You ought to try it out now to see for yourself. I personally love how satisfying it is to tear the backing, if you love a bit of ASMR... head to my Instagram to watch the reel (make sure you turn the sound on).
PRO TIP FOR STATIONERS: If you are using a double sided adhesive to seal your client's envelopes, make sure you use a tape gun. It's more efficient than cutting and taping one by one!
For those who are planning to ordering our envelopes, this is an option you can include on our website for both our luxury envelopes or handmade paper envelopes.
Do you have a video I can refer to?
If you are a visual person, you can scroll down and watch the reels from my Instagram. Make sure you bookmark it on Instagram so you can watch it back later.
I hope this blog post was helpful. Bookmark this blog so you can always come back to it. If you are a stationer or bride-to-be, give this a try and hopefully you'll find this tip helpful. Please share it with a friend or tag us on Instagram.
Much love, Keth ♡
_________
If you follow me on Instagram or Tiktok, you would be familiar with videos I share. Below is the Instagram reel that feature a quick tip on what we covered today in this blog. Watch it a few times or get in touch if you have any questions!